External hard drive is more vulnerable than a stationary carrier. It is constantly moved from place to place, exposed to environmental influences, risks of falling and incorrect connection. Therefore, it fails noticeably more often. If the next time you connect to a computer, the operating system cannot detect it, this may indicate damage to its file system. Let's look at how to restore external media without formatting.
Causes of problems with a removable disk
- The file system is damaged.
- The device has encountered a software failure.
- The removable hard drive has been exposed to a virus.
- The device was not properly disconnected from the computer.
- Careless handling of the drive, mechanical damage.
Is it possible to restore a portable hard drive yourself without formatting? In most cases, unless the device was damaged mechanically, the data on it can be recovered. To do this, we will consider 2 methods.
Recovering media using Windows
The external hard drive is checked for errors. To do this, launch the utility, which is included in Windows. To run it you need to command line enter the command “cmd”. After confirming the command, a console appears on the monitor, where the line “chkdsk h: /f” is written, in which “h” is the letter of your removable drive.
If, when trying to check, the computer displays a message stating that at the moment it is impossible to perform the check, then you need to agree to the offer to check the selected disk during the next system reboot.
You can choose another way to check the disk for errors, which is more visual and accessible. To do this, follow these steps:

In most cases, after scanning, the hard drive will completely restore its structure without formatting. After the treatment is completed, it will start on its own, and all data will be visible on the monitor.
Recovering an external drive using R-Studio
You can restore external media without formatting. This utility works with all known file systems, recovers information from deleted and damaged partitions, and works with encrypted files.
After starting the program, all drives will be displayed in its window.
All media connected to the computer will be visible on the left side. Media recovery is performed in the following order:
- By selecting an external hard drive from this list, you can look at information about this media. It will be displayed in the right window.
- When you click on the “Scan” button, the program will scan the selected media and display information in the form of colored clusters.
- When you hover over a cluster, all information about it will be displayed on the right side of the window. The duration of the scan depends on the storage capacity. In some cases it can take tens of minutes.
- At the end of the check, a window similar to the following will appear:

- We need to go to the “EXTRA FOUND FILES” subsection. A list of found files will appear.

- Now the found files can be restored. To do this, we need to put tags next to the files that we need.
- Press the “RECOVER” button. If you decide to restore all found files, you can immediately use the “RECOVER ALL” button.
- After confirming your choice, you need to decide where to save the recovered files.

Since they take up so much space, a decent capacity hard drive is required. If there is a shortage of free space on the media, only part of the information can be restored. The recovery operation begins when such a window appears.
Like anyone else operating system The Macintosh operating system also includes logical drives or local partitions, such as:
- HFS+ (Hierarchical File System)
- HFS (Hierarchical File System)
Common Causes Causing Lost or Missing Septum
There is always a situation happening that a file in a Mac is lost, mistakenly deleted, or simply missing. So this section. The partition in Mac can also get lost or deleted, which brings you the misfortune of losing all the files saved on it. There are some common reasons causing a lost partition:
- Virus attacks, power surge
- Indefinite system shutdown
- damage software
- File system corruption
Recover Lost Partitions with Wondershare Data Recovery for Mac
In fact, getting back a lost partition is quite as simple as 1-2-3 if you choose the right Mac data recovery tool. Wondershare Data Recovery for Mac is such a simple program for everyone to recover lost partitions with just 3 steps. Let's try it.
- Recover lost or deleted files, photos, audio, music, emails from any storage device efficiently, securely and completely.
- Supports data recovery from recycle bin, hard drive, memory cards, flash drive, digital camera and camcorder.
- Support for data recovery for sudden deletion, formatting, hard disk corruption, virus attack, system failure in various situations.
- Preview before recovery allows for selective recovery.
- Supported OS: Windows 10/8/7/XP/Vista, Mac OS X (Mac OS X 10.6, 10.7 and 10.8, 10.9, 10.10 Yosemite, 10.10, 10.11 El Capitan, 10.12 Sierra) on iMac, MacBook, Mac Pro, etc.
3981454 people downloaded it
Install and run it on Mac. Do the following simple steps to recover lost partitions.
Step 1: Select the type of files you want to recover. To recover deleted partitions on Mac, you can select a specific file type or select the All File Types option to get started.

Step 2: Select a location to start scanning your lost partition. If you are not sure about the location, you can go to select "I can't find the partition" to scan for lost files.

Step 3: Select partiton where you want to scan lost files.
Step 4: Deep Scan Recovery. If quickly cannot find the lost partition data, you can go to deep scan mode, which will take quite a long time to find the lost partition, including all the partitions that were lost before.

Step 5: Preview the recovered files. After the deep scan, you can preview the recovered files and click the "Recover" button to save.

Note: If you have an external hard drive connected to your Mac, the lost partition of the external hard drive will also be scanned out. So, if you don't want to recover your lost partition from other hard drives, make sure they are not connected to your Mac.
After selecting the target partition, you can use the filtering options to select the types of files you are going to get back. As an experienced user, you can also set the specified area from the starting and ending sectors. Then click the Scan button to recover all the data inside the partition and save it on your Mac.
3981454 people downloaded it
Ask a question
Want to know more about the service? Ask us!
Even the most reliable computer equipment sometimes breaks down. If malfunctions of various types occur with the hard drive, the system simply does not start, and everything on the disk important information. What to do? Contact our computer service. Our professional technicians will help you perform data recovery on your Mac hard drive. You can call a specialist directly to your home by contacting us by phone or through the form feedback on our website.
Recovering Data from a Damaged Mac Drive
Hard drives are one of the most vulnerable places. If any serious malfunctions occur, the disk simply fails, however, the data from it can still be recovered.
Restoring data on a Mac when the hard drive is damaged comes down to partially repairing the drive and then transferring all the information to a working drive. The main causes of hard drive failure may be: problems of various types with the controller, malfunctions of magnetic heads, breakdown of the head unit itself or a special spindle, damage to mechanical plates.
If the surface of magnetic plates is heavily damaged, it can be very difficult to recover information. In these cases, specialized stands are used, with the help of which partial reading and transfer of surviving data is carried out. In order for the data recovery procedure on a Mac to be successful, you need to use special equipment to read as many damaged sectors as possible and transfer all undamaged information from them.
Our computer service performs the following types of data recovery work from a Mac hard drive:
How to recover accidentally deleted data from Mac?
In cases where the hard drive is in good working order, but very important data was deleted as a result of a series of careless actions, then data recovery on a Mac is carried out using special software. There are times when, due to inexperience, you did some actions in macOS, sometimes you yourself don’t know what, and you lost very important data. Deleted files are not actually immediately removed from the disk. They are simply hidden, and in the future they are simply overwritten with new data. Therefore, they can always be restored if they have not yet been replaced by new files.
For these purposes, the following programs are used:
- Time Machine. This program is included in the core software package of the Mac operating system. Its main purpose is to create backup copies of all data on the Mac's hard drive. Copies are created automatically. With its help, you can always restore data;
- R-Studio for Mac. This is a fairly convenient and effective program with which you can restore erased data. The program uses a special algorithm for searching and recovering data. With its help, you can recover data even after completely formatting the hard drive.
- Data Rescue. Another effective program that helps to recover lost data. The program is capable of recovering data from both HDD and USB drives. It has rich functionality and fast operation;
- FILESALVAGE. This program is based on deep disk scanning and helps to recover erased data even after completely formatting the hard drive. It recovers video clips and image files of various formats very well.
If you need to perform high-quality data recovery on a Mac, then contact our computer center. The technician will come to you, conduct a full diagnostic and restore data from a damaged disk or accidentally deleted one. To call a specialist, call or write to the feedback form.
Among other products manufactured under the Apple brand, MacBook Pro laptops are especially popular, having earned the reputation of powerful, productive and reliable equipment. They are also recognized by many official awards and reports.
However, despite positive user reviews and positive test results from specialists, even such a perfect creation, equipped with one of the most stable operating systems, refusalMacBookPro quite possible.
A one hundred percent guarantee of the safety of user files today can only be given by such an “antediluvian”, but proven measure as backup valuable information.
In all other cases, the user must be prepared for the fact that his equipment may sooner or later fail, so he should have at least a small amount of knowledge on the design of modern storage media and minimal skills in the field. recover lost data.
If there are any doubts about their abilities, the user can always count on help from the GOST.LAB laboratory, whose specialists have been working in the field for many years data recovery and have accumulated extensive experience in rescuing data from a wide variety of media. Our technical equipment includes only the most modern equipment, as well as highly specialized software. If necessary, work is carried out under sterile conditions, which are provided in a special high-cleanliness box.
In addition, by trusting us with their problem, the user can be 100% sure that confidentiality of his data will be respected. All files are stored on equipment that does not have access to any networks, so it is technically impossible to steal them. And after the work is completed and the information is returned to its owner, the entire array must be destroyed by repeatedly overwriting the disk space.
The most common situations in which it is necessary recover data fromMacBookPro, are:
Varied software glitches which may occur, including due to changes in power supply or incorrect shutdown of equipment, in this case, restoration measures will lie primarily in the software plane,
- mechanical breakdowns drives, which happen quite often and require hardware intervention, which is practically impossible at home,
Erroneous actions on the part of the user, for example, if there was random formatting disk space or deleting necessary files, in this situation it is better to turn to professionals, since specialized software may be needed, and in addition, the work requires the performer to have some skills and in-depth knowledge of the design of modern storage media.
In any case, before starting work, it will be necessary to conduct a thorough diagnosis of the equipment, which determines the composition of the complex of restoration measures and its methodology. Within the GOSTLAB laboratory, diagnostics are carried out free of charge and only take a few minutes. After this, our employees will tell the owner faulty equipment about the problems found, and will also announce the cost and timing of the work.
If any signs are detected laptop malfunctionMacBookPro You need to contact knowledgeable specialists as soon as possible. You should refrain from using third-party software, since such operations are very risky. Contacting a professional information recovery laboratory will help avoid even more serious problems.
And in order not to encounter any troubles at all, you need to do it in a timely manner backups important data. Backing up information should be strictly periodic, and also mandatory when making significant changes to the file array.
It refused to boot. CMD+R doesn't help. What should I do?
The start of the working day did not foretell anything bad. A cup of coffee, a good mood, the Power key and the MacBook displays the following sad picture:

A restless thought immediately flashed through my head about the safety of the data, the current version of the backup copy TimeMachine(which was not at hand) and possible loss of information.
Attempt No. 1. Booting into recovery mode
Being an interested user and an avid Mac user, I immediately tried to start the MacBook in recovery mode by holding down the keys CMD+R. Instead of the usual disk utility, the system greeted me with a window with an attempt network recovery.

Having chosen home Wi-Fi network, I began to wait further development events. After a few minutes, OS X's recovery progress was interrupted error -4403F.

Attempts to start the process again led to exactly the same result. Rebooting the router confirmed that everything was fine with the network connection.
Trying to diagnose the Mac, fix possible hard drive errors, or simply reinstall the system was now out of the question. Section with Recovery HD, in which the tools for restoration are stored, ordered to live long.
Attempt No. 2. Resetting PRAM and NVRAM
Mac computers were created by highly qualified engineers, so the correct organization of the entire system and the presence of “hidden hardware reserves” allows you to avoid a number of interruptions in its operation. One of these reserves is memory sections PRAM And NVRAM. It stores settings data that is not reset even after the computer is disconnected from power. To revive the fallen system, a decision was made reset PRAM and NVRAM settings.
1. Turn on the Mac.
2. After the white screen appears, quickly press the key combination CMD + Option + P + R.
3. Hold until the Mac reboots again and the Mac greets the sound.

PRAM and NVRAM reset completed.
Although they say that hope dies last, it, lifeless and barely alive, continued to lurk in my mind. Resetting PRAM and NVRAM did not affect the error when loading the system. The MacBook continued to test my nerves.
Attempt No. 3. Reset SMS
Having gotten used to storing all the necessary data “in the cloud” or on removable media, the most simple solution global problems There was always a reinstallation of the system from scratch. This case was special. I needed data stored in memory and I needed a working Mac today.
In the Mac environment there is something called system management controller SMC. The stability of the entire system depends on the reliability of its operation. Resetting SMC settings can cure a number of problems like:
- – constantly high rotation speed of the cooler even at minimal load;
– freezes while the system is leaving Sleep mode;
– errors related to the operation of additional peripherals or external monitors, as well as correcting system boot problems.
To reset the SMC, follow these steps:
- Laptops with built-in batteries
1. Turn off your MacBook and plug in the power adapter.
2. Press and hold the keys at the same time Shit + Control + Option + Power and hold until the MagSafe adapter indicator changes color.
3. Release all keys and press the key again Power.
- Laptops with removable batteries (older models)
1. Turn off your MacBook and unplug the power adapter.
2. Remove the battery from the laptop.
3. Hold down the key Power And hold for at least 5 seconds.
4. Release Power, insert the battery and connect the power adapter. Turn on your laptop.
- Desktops (iMac, Mac mini, Mac Pro)
1. Completely disconnect the computer from the mains power.
2. Wait at least 30 seconds.
3. Connect the power and wait another 5-10 seconds and then turn on the computer.
The above actions can become really effective and the system will start. In my case, a miracle did not happen.
Attempt No. 4. Recovery using a bootable USB flash drive
An attempt to revive the system using the above actions was unsuccessful. The only option left was to reinstall OS X using bootable flash drive. For this step you will need:
- another computer running the OS X operating system;
- Flash drive with a size of at least 8 GB.
Preparing a flash drive
1. You will need to download the OS X Yosemite distribution from the Mac App Store.
2. To create a bootable USB flash drive, download the DiskMaker X utility (distributed for free). You will need it to deploy the distribution.
3. Format the flash drive using Disk Utility V Mac OS Extended (Journaled).

4. After the distribution has finished downloading, cancel the proposed installation and run the utility DiskMaker X.
5. Choose a system Yosemite (10.10). The utility will detect the distribution in the folder Applications. Click Use this copy(use this copy).

6. Select the drive installed in the USB port and agree to the warning about completely deleting all data present on the flash drive.

7. The process of mounting the distribution kit with OS X Yosemite to the drive will begin.

The copying process takes about 10-20 minutes and depends on the writing speed of the USB flash drive. During mounting, dialog boxes and folders may occasionally open on the screen. Never mind.

Once the OS X Yosemite image has successfully deployed, remove the drive.
System installation
1. Insert the flash drive into the USB port of the “problem Mac”, press the key Power and hold down the key Alt.
2. In the list of available partitions for downloading, select OS X Base System. Please note that there is no section Recovery.
.

3. The Mac will boot into recovery mode. After selecting the main system language, the installation menu will open. In the top menu you will find a standard list of utilities.
Use disk utility and first try to check the access rights to the system partition and correct any errors. If after rebooting the system still refuses to boot, you will need to separate a partition of at least 20 GB in size for installation purposes new system. You will find detailed instructions on how to partition a disk.
From the same menu, you can either begin the process of installing the system on a newly created partition, or restore the system using a TimeMachine backup (see).
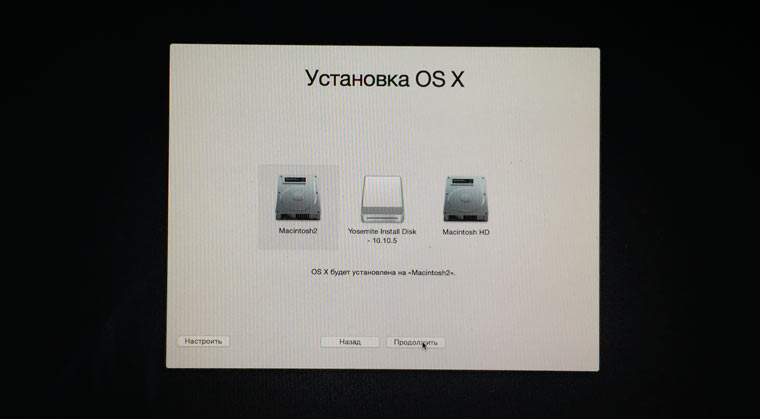
CAREFULLY! Be careful when choosing the installation partition. The installation must be carried out not on top of the old partition, but on a newly created one.
After installation is complete, you will have access to all data located on the “corrupted” partition with old version systems.